Monday, March 5, 2012

UPDATE!

I don't know when I'll be doing more sewing or creating or what not.  We are knee-deep in the middle of transitioning our newest additions to our family - twin one-year-old BOYS!  God's blessings are overwhelming!  We found out January 11 that we had been matched.  It's funny because earlier that same day when I was reflecting on my goals for 2012, when it came to "SOWN" I had nothing to write down - and then that phone call...

So its been quiet here, and will continue to be...

BUT, I could not keep this to myself.  It's a letter from the center where the sewing machine fund was sent.  So many of you were a part of getting this money there, that I HAD to share it with you - participants in sowing seeds to reap a reward for the kingdom.  What an honor and privilege to share this with y'all...


February 23rd,2012

Dear Beloved:


We want to greet you in the name of our Lord, Jesus; we wish you success and daily blessings.

Through this note we want to thank the support given to our CFE –Formation Center- Monte Sinai, located in the village 
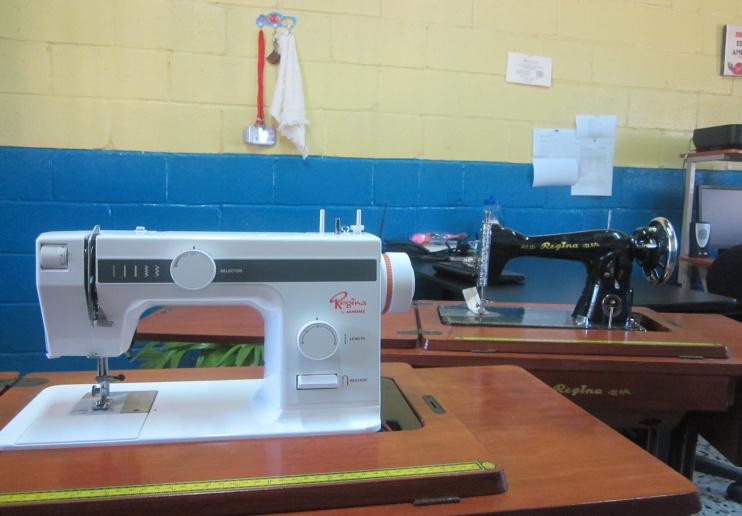
of Villa Laura, because it was received from you a donation of a Sewing machine Regina Brand.

It has become to help a program that we want to implement, in order to help mothers of several families to learn something practical that allow them to raise some money to support their families, and take care of them at the same time. 

We have a group of 30 mothers willing to learn, and classes will be Monday and Friday from 9:00 a.m. to 11:00 o´clock. Before we had one sewing machine, but now with two of them will be easier to teach in small groups theory and practice. We know it is a little step, but we pray the Lord, He will allow us to have more resources to teach different skills to the families, the need is huge.

     Thank you, we don’t know how to pay the effort you have done, it will be a blessing for this group of mothers to learn something new, and it will help their self-teem, to be able to do something different, they are excited, as we as Center, are too, because we want to be a blessing for this community, with your help now it is a dream coming true.

     We will be praying for you,
     
     God bless you,   


I encourage you; that whatever it is you are doing... whether it seems like a big thing or a little thing, God will honor it.  Do it all for Him.  Blessings!

"And whatever you do, whether in word or deed, do it all in the name of the Lord Jesus, giving thanks to God the Father through him."  
Colossians 3:17

Wednesday, November 30, 2011

Creative Giving Class - FORT KITS!

We had a lovely, laughter-filled morning of fort-kit-making!  Really, we didn't make the kits, we just prepared the sheets for kits.  Basically, you sew loops on the corners, side, and middle of each sheet.  Then  you add some clothespins or clips to it to make fort-making a bit easier for the kiddos.  I only picked up my camera one time.. here Erica is getting ready to pin some loops on sheets, while Aimee sews along...
The original tutorial (link below) suggested using t-shirt strips for the loops because the material is stretchy and doesn't fray.  Aimee had the genius idea of alternating ribbon with the t-shirt loops.  This way the kids can tie their fort onto something if necessary.  Also, if you notice, Aimee used white sheets for her kit and she is going to include fabric markers so the recipients can decorate their fort.  Isn't that clever? 
And I had to snag this picture off of facebook... Tami got three kits ready for gifting while she was in class (but I didn't catch her in the pictures above).  She obviously ended up giving her kiddos a kit yesterday :)  There were MANY pictures of her family playing with this kit in the afternoon.  So adorable! 
Here is the link to the kits: click here!

And as you know, the Creative Giving classes are free; but I do accept donations to go towards the sewing machine fund for AMG International - Guatemala.  Its awesome to get together, have fun, teach a skill AND make a difference all at once.  The sewing machines will provide an opportunity for parents to learn a skill that can potentially provide additional income for their family... that is HUGE!  And I am happy to announce that we're up to $338.77 toward the sewing machine fund!  Woo Hoo!  Praising God for the generosity of those participating in the Creative Giving Classes!

Wednesday, November 16, 2011

Creative Giving - Fabric Flower Headbands!

I confess, I forgot to get the camera out during "class."  So I had to take a few pictures of myself after the fact.  I didn't feel like a dork at all ;)

Ok, these babies are easy... and versatile.  This one even looks totally different depending on which way I wear it...
see... totally different.  Huh?
And a little closer shot.  I chose three flowers of varying sizes using two fabrics.  I used a super-skinny-headband because headbands tend to give me a headache, so I thought the skinnier version might not be as bad. 
Once you get the hang of making your fabric flowers, you can attach them to anything... alligator clips, barrettes, pins, elastic headband, purse straps, t-shirts, flip-flops, key chains... the list could go on and on... ;)

Here a couple links with different variations of how-to make these babies.

This link from Prudent Baby has an excellent step-by-step tutorial for the rolled flowers.  It doesn't really explain how to attach the flowers to the headband though.  But this is the way that I learned to make the rolled fabric flowers, so I wanted to be sure to pass it along.  Prudent Baby has tons of great stuff so you might want to take a peek around while you are there. ;)

This link from lil blue boo also has great step-by-step tips for making rolled fabric flowers using pipe cleaners (or chenille stems if you want to be politically correct).  I've never made them this way, but it seems like it might almost be easier... This tutorial also goes into detail about adding the flowers to your headband so be sure to check it out if you aren't sure about that part.  You'll find a wealth of other ideas at lil blue boo too, so browse for more ideas while you are there!

Now just a few tips from me. 
  • First off, I think Fabri-tac is the best glue for this.  You could use your hot glue gun or another type of Tacky Glue, but my fav is by far Fabri-tac.  
  • And secondly, give yourself a break and just have fun.  Your very first flower might not be perfect.  I aim for one side being rather gummed-up and gluey, and one side to be "clean."  Sometimes my clean side has a little glue on it...  I'm pretty sure no one will notice it on your finished flower.  So don't stress. 
  • Finally, a word about the fray.  I don't mind the frayed edges of the fabric showing.  I actually rip my fabric strips (instead of cutting them).  If you aren't a fan of the fray, then pay close attention as you are twisting & gluing and tuck that fray under.  Remember, nobody is going to see the bottom so it can be a big crazy mess under there. ;)
Have fun!  As always, I'd be happy to help you through if you decide to try this and get stuck.  These are FUN and SIMPLE, really, they are!!!  And not too expensive either.  You CAN do it!    I'm sure the bloggers I linked to could also be of great help... if you need it!


As for the sewing machine fund... we are up to $288.86!!!  Woo-hoo!  Thanks for the donations and custom orders ;)  I'm going to send in the grand total after the last Creative Giving class in December.  So I will keep you posted!


Tuesday, November 1, 2011

breathtaking

every once in awhile God reminds me in breathtaking ways about His great love and His special plans for us.  The last two weeks have been rather crazy, between Halloween costumes, a creative giving class, and a "craft fair" (that could be another post for another day).  Well, in the midst of my SOWN commitments, a dear friend of ours delivered her sweet baby boy at 27 weeks and 2 days.  He has a very rare condition, but continues to amaze his doctors each day.  He wasn't expected to survive delivery.  I knew - in the middle of everything else going on - I knew I HAD to make something for that sweet baby boy as a tangible reminder that he is loved dearly and being prayed for often.  I used some fabrics that I had on hand and appliqued his nickname on the front of this minky-dot burp rag. (And I learned that perhaps iron + minky dots = flat minky).  

You can just barely see an orange ruler in front of the box that this is laying on... the letters are about two inches wide.
They sort of seem giant in this picture with Lil' Buck laying beside them. Don't they?
I can't really put into words how I felt when I saw this picture for the first time.  The best word I can use to describe it is breathtaking. 

I love that God gave me a creative streak; but I really come alive when He asks me to use it to show His love for others - and I obey! 

I'm honored to be walking through this journey with Buck's family.  I am praying so often each day and throughout each night.  This little guy's life has blessed mine in immeasurable ways.  I keep praying that God will continue to touch this little one's body and bring healing and strength.  I pray that He will comfort Buck's parents and give them endurance for each day.  I pray that He will encourage Buck's siblings as they are away from mom and their new baby brother.  If you'd like to join in praying for this sweet little boy, I'm sure his family would be grateful. 

In the midst of this bit of busyness, God has reminded me of the things that matter the most. 

Wednesday, October 26, 2011

Creative Giving Class #3

Oh my did we have fun! Well, I certainly had fun! Today's class was crayon rolls or a modified version for cars.  I'll add a few links at the end for places to look for tutorials.  I've made so many crayon rolls with my own variations that I didn't use a tutorial today.  And then we modified it to make it work for some Cars from the movie Cars (which tend to be a little bit bigger than matchbox cars - and still poor Mater had no where to park his big tow truck self!)


We go to work cutting out the pieces, and decided we had time to go ahead and make two car rolls - because Stephanie has two boys it only made sense!
Miss Maria over there in the sunlight brought a project that she has been meaning to finish, so she got to work on that while we worked on the rolls.  Stephanie sat down behind that machine and it was like she'd been sewing all along!  Great fun!
I did forget to take a picture of the final product... but if you look really carefully in that picture right above this, you'll see one of the car rolls laying on the table in the bottom right side.

And for some AWESOME news... we are up to $202 towards the sewing machine fund.  I nearly got all teary-eyed when we counted the money this afternoon!  Praising God for His goodness.  We had a sweet time together; and to top it off I got to hear an wonderful adoption story.  God sure knows how to send me the sweetest encouragement at just the right moment!

Tutorials to check out for crayon rolls...

THIS is the first tutorial I ever tried, but the ric rac almost made me lose my mind, so I never use the ric rac. It's a very well written tutorial by Skip To My Lou.
THIS has a button & elastic closure instead of ribbon ties. You'll find lots of other things to explore at The Pleated Poppy.
...also if you google "crayon roll tutorial,"  you'll be sure to find one you want to try!  I always make my crayon rolls hold 8 crayons.  The first ones I made were for the boys while Daddy was deployed, and I made them to keep in my purse for going places... the last thing I wanted to do was track down 36 crayons to put back in the rolls when we were leaving.  So you can basically pick any number of spaces you want and adjust your pattern to make it work for you.

I couldn't find a basic car roll tutorial that was as simple as the one we made.  We basically made an 8-pocket crayon roll into a 4-pocket car roll, and added 1/2 an inch to each pocket (2 inches overall).  But here is a link to a fancy-dancy car roll that I've made in the past, I know the tutorial is well written! homemade by jill is a lovely blog with lots of other goodies to explore!

Remember, if you decide to try one of these on your own you can always ask me questions about it if you get stuck!  Or, you can ask the blogger that wrote the lovely tutorials too. 

The next class is a no-sew one!  Should be a great time!

Tuesday, October 25, 2011

learn something new...

...everyday... when possible. 

Sometimes I forget how amazing Army wives are... I suppose I should say military spouses in general... they are amazing.  For example, a neighbor down the street is moving tomorrow to Germany.  Her husband has been there for over a month.  He went ahead - to a foreign country - to pick out housing.  Meanwhile, she's had her three boys in school just waiting to see when they'd join him.  She was busy clearing housing last week (when they inspect your on-post house to see if there are any damages that you need to pay for) when she called to see if I wanted some cub scout stuff that they weren't taking with them. I'm not one to reject free stuff, so of course, I said yes.

I stopped by and was amazed at how well she had the house cleaned and packed, just a few more days before they would travel overseas to their new home.  She didn't complain or seem scared, just ready, for international travel by herself with her three boys and two dogs.  Amazing, right?

As we chatted she asked if I could hem some pants.  I told her I probably could, but they might not look that great.  I had never successfully hemmed pants before and I wasn't sure I had the time to get it right... or that she had the time either. 

Being a long-legged girl myself, I had never really been too sympathetic to those that need their pants hemmed.  I figured you can always cut off the pants, but you can't add to them. 

Well, she said she didn't care what they looked like, she just didn't want to be walking on them.  She said her husband told her that it was freezing cold in Germany right now, and that she only had one pair of pants that was the right length.  So I told her to bring them over and I'd do what I could.

Wouldn't you know she had three pair of pants WITH TAGS ON!  Oh dear, I really didn't feel right about a hack job on new pants. As I pinned them, she was telling me that they were all petites... and they still needed hemmed. I suddenly felt a little guilty about all the times I glared jealously at not-so-long-legged girls and their right-length-pants.  I pinned all three pair, and told her I'd try a pair and see what happens.  I was up against another deadline as well, so I just prayed that God would help me figure it out.

Thankfully, I remembered seeing some hemming pins on pinterest.  And eventually used this pdf to help me through this new adventure...
I had to use a different method for the pants, so I had to pull out my trusty sewing machine manual to figure out the blind stitch using the blind stitch foot. 
I thought the jeans turned out pretty well.  Way better than I thought they would in my head.  Honestly, I thought I was going to just have to cut them off and sew them with a dark blue thread.  I know my neighbor imagined the same thing -- which to her was still better than walking on them -- I wasn't home when she came to pick them up but her text said "I can't believe how good the jeans look!"
As it turns out, I didn't have the blind stitch foot in my sewing machine's secret compartment; so I had to google for a tutorial that showed me how to do it without a blind stitch foot.  Thankfully, I found one here.
All in all, I was pretty well pleased with how they turned out.  And I thanked God for giving me the opportunity to do something nice for my amazing Army-wife-neighbor before she left town.  She asked me what I owed her, and I told her nothing... "thanks to you, I learned a new skill!"

Monday, October 24, 2011

keeping {so} busy

...in a good way. Although, I did feel a good strong warning to be careful about taking on more than I can handle.  I had a custom order to make 3 dwarfs (out of the 7) and an Old Hag costume.  It was really quite fun... but also quite a bit of work.
I had a huge sense of accomplishment when I finished.  2 of the 3 dwarfs are the same ages/sizes as my boys so I had them try on Dopey & Sleepy's costumes.  I am hoping that Snow White loves them and that they exceed her expectations!
They are in the hands of the U.S. Postal Service now...